Mudroom reveal!! Ya’ll, it’s finally finished!!
All said and done, we worked on this room on and off for seven months. It was mostly working on the weekends or in pockets of time throughout the day, sometimes late nights trying to push through to the finish line before a holiday or birthday party. And now I’m standing in a room that went from four white walls and lvp flooring to this. I am so happy with how it turned out!
This is the full breakdown — the design, the installs, things that went wrong, and products I used. Enjoy!
How the Design Came Together
When we started this room it was a completely blank slate. Four white walls and lvp flooring. That’s it.
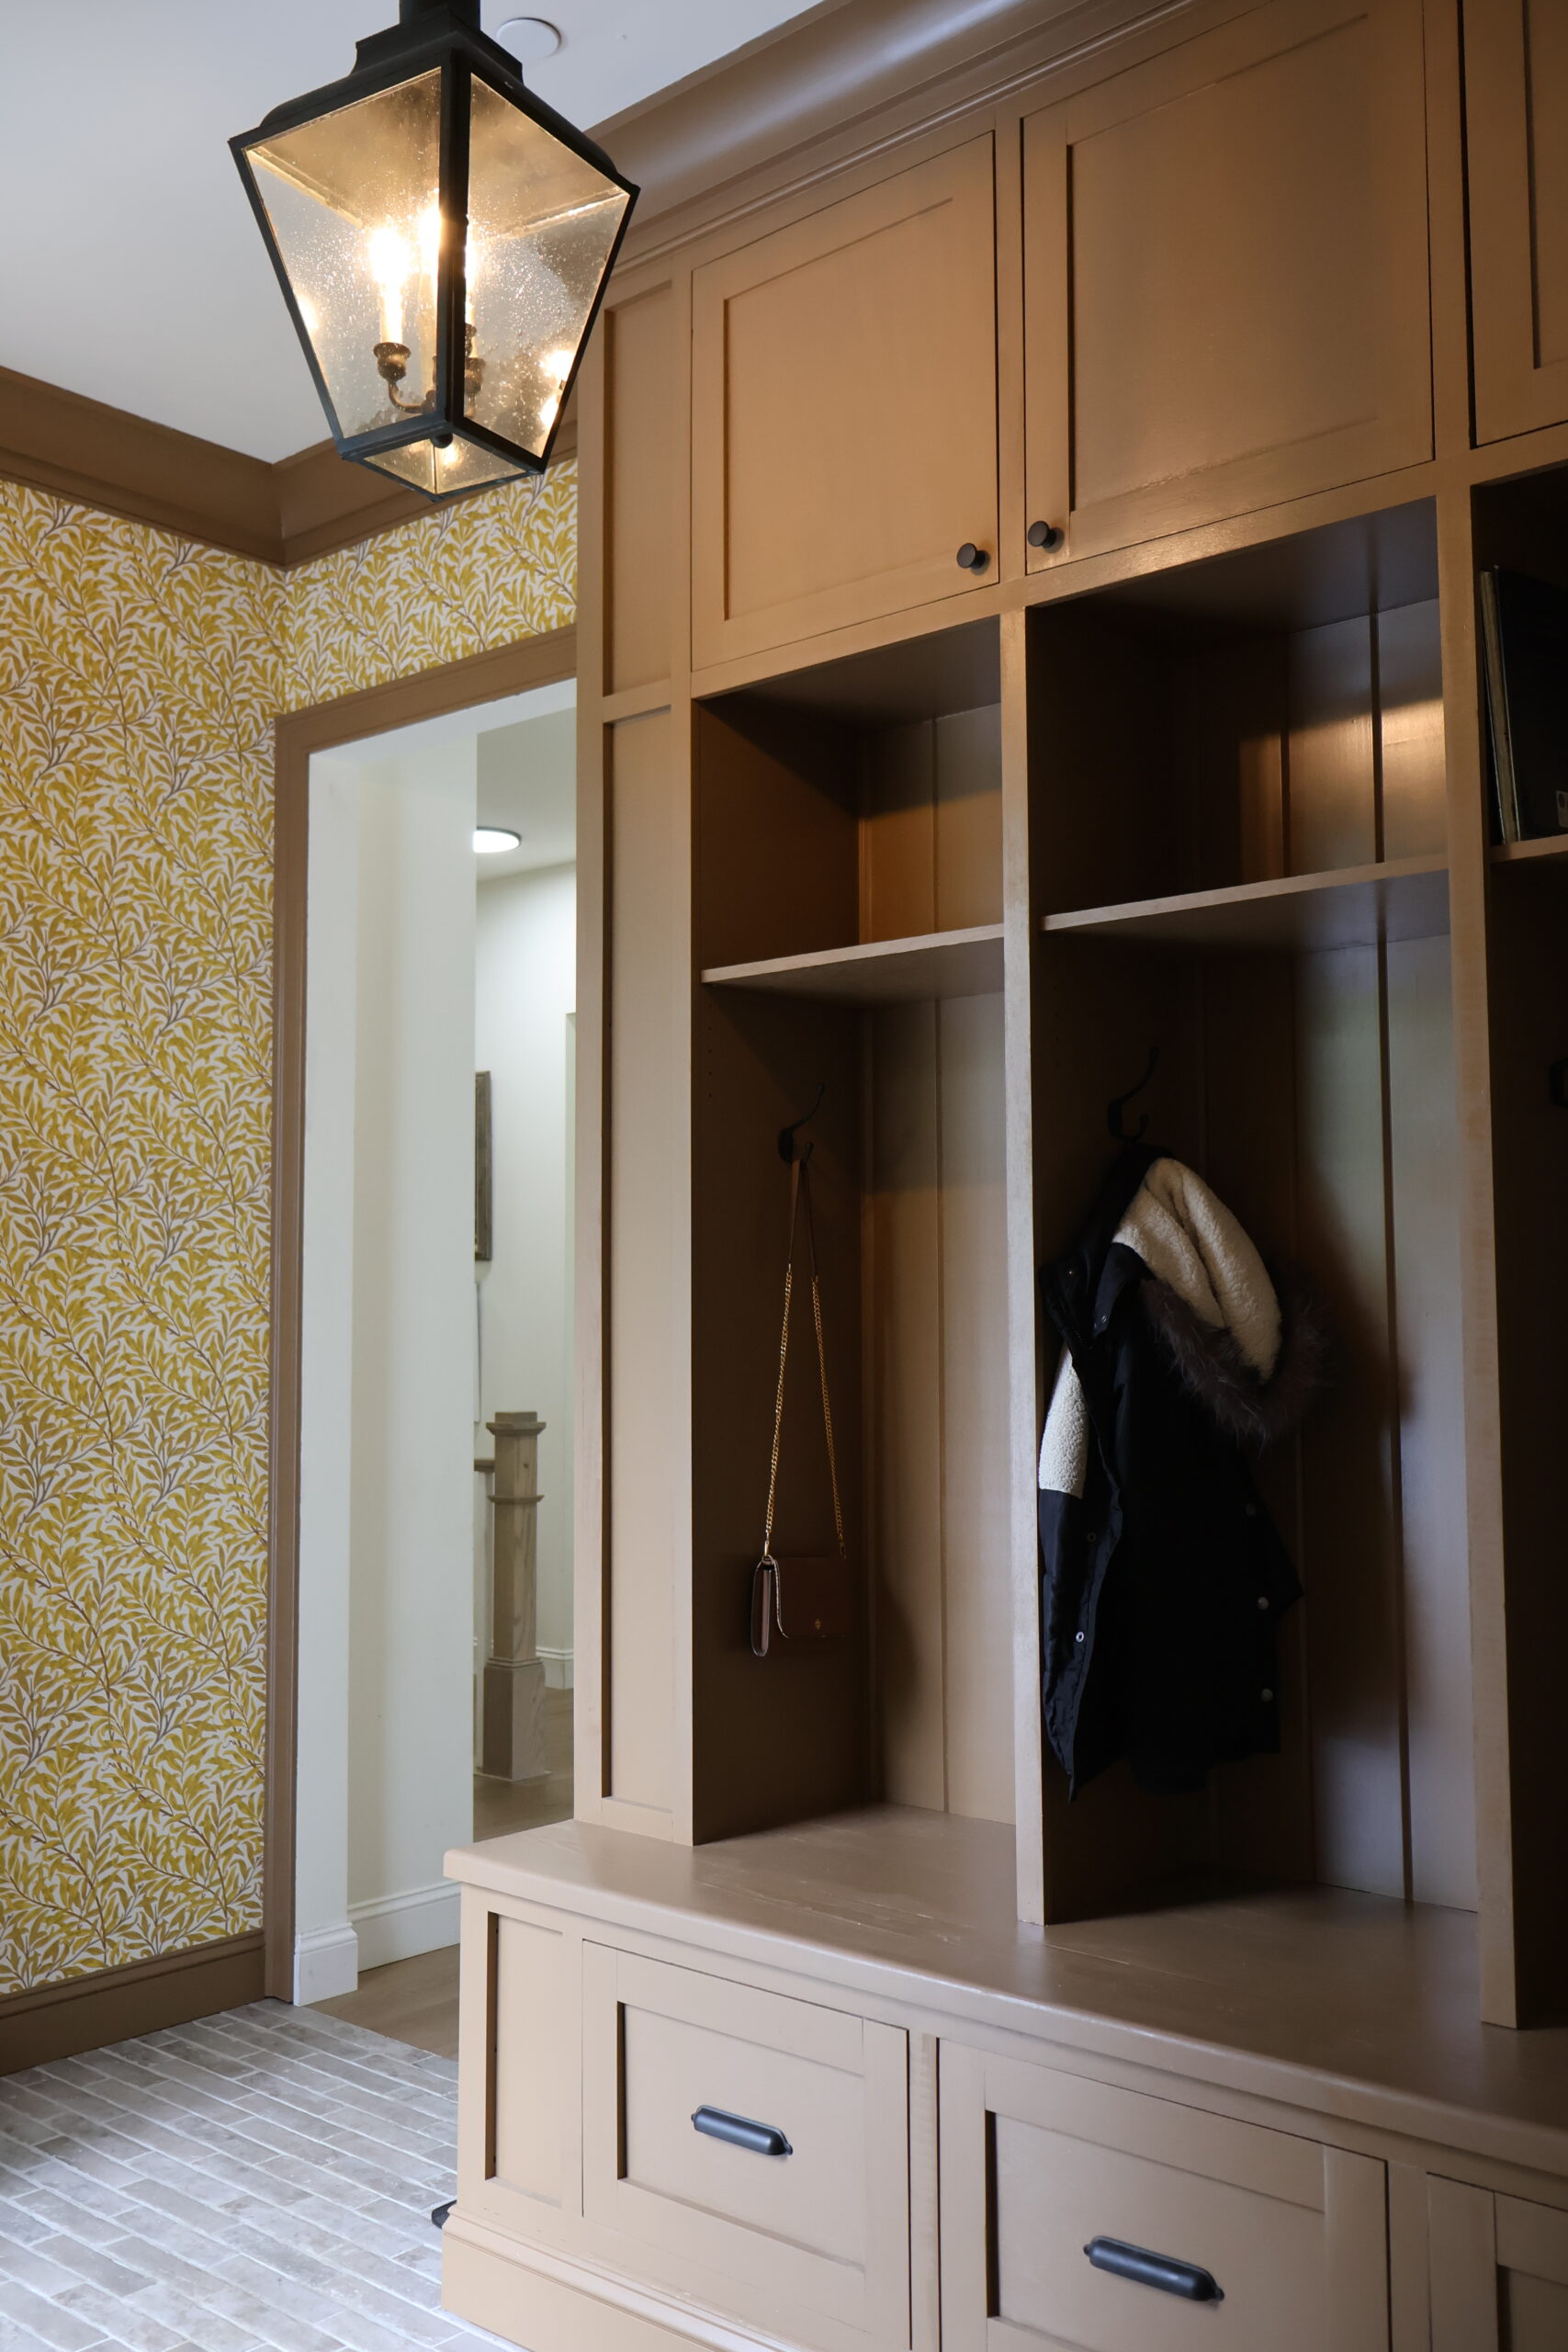
I knew going in that I wanted the space to feel classical and timeless. Georgian colonial specifically. I love when a home feels like it belongs to the place and the history around it. I think every home should feel like it represents where it’s located, so I do a lot of research on historical homes from the region I’m in when I’m designing a space. We live in the mid-atlantic region. Think Colonial Williamsburg and Jefferson’s Monticello and I wanted the design to reflect that kind of character and also bring it into the present day.
Two things anchored the whole design before anything else was decided: a brick tile floor and the color yellow.

The yellow was a feeling I was chasing before it was a specific color. I wanted the room to feel like the sun coming up over a field of grass in the early morning. That warm, golden light right before the day really starts. Very Pride and Prejudice. Once I found the right yellow I knew everything else would fall into place.
I found the tile first. The Ackland Montello 2×10 Matte Porcelain Brick Look Tile from AllModern showed up on Facebook Marketplace — someone selling 100 square feet of their leftovers for $250. I jumped on it immediately. That tile retails for significantly more, so finding it secondhand made a big difference in the overall budget.
The wallpaper came next. Morris & Co Willow Bough in Summer Yellow. The second I saw it I knew it was the one. That warm golden botanical pattern on a cream background was exactly the feeling I had been picturing.
Once I had the tile and the wallpaper, the paint color for the built-ins was easy. Benjamin Moore Baked Pretzel in semi-gloss — a warm, golden brown that pulls directly from the ochre tones in the wallpaper. The trim, the crown molding, and even the interior sides of the doors are all the same color.
And the lantern, oh the lantern! I found an antique copper genie lantern with seeded glass from an antique dealer on Facebook Marketplace. It was love at first sight! It came from the Hershey Hotel in Pennsylvania and has a beautiful natural patina. There is nothing else like it and it is my favorite piece in the whole room.
The Tile Floor
The tile floor was the first major install and we did the whole thing ourselves.

We laid the Ackland Montello porcelain tile in a running bond brick pattern using MAPEI Ultracolor Grout in the color Pewter. I chose to install it with a tighter grout joint than the manufacturer recommends because I wanted the grout line to be thinner and let the tile itself do the work. It takes more patience to set each piece carefully, but it was absolutely worth it.
My biggest tip if you are tiling for the first time: wipe your grout immediately!! Every single wipe, use a clean sponge and fresh water. Don’t let grout sit on the tile surface and start to haze. On a matte porcelain like this one it is really difficult to clean up after the fact, and the haze shows. We made the mistake of not doing this and I was scrubbing grout off for days afterwards.
Tile materials:
- Ackland Montello 2×10 Matte Porcelain Brick Look Tile (sourced via Facebook Marketplace)
- MAPEI 50-lb Gray Powder Floor Tile Thinset Mortar
- MAPEI Ultracolor Plus FA Sanded Grout — Pewter
- Schluter DITRA Waterproofing Tile Membrane
The Custom Built-Ins
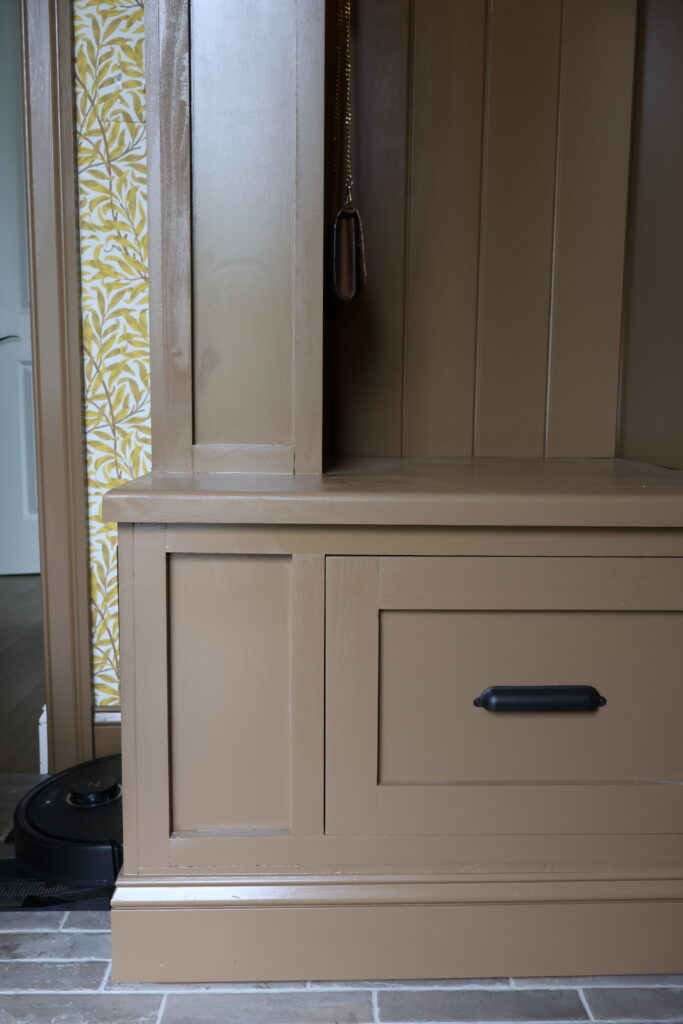
The built-ins are completely custom. We built them from scratch — no stock cabinets, no kits. My husband and I framed everything ourselves: the floor-to-ceiling uppers, the bench, the cubbies, and the shoe drawers underneath.

The crown molding is built up from two separate moulding profiles layered together. This is a classic millwork technique for getting a crown that looks custom and proportional, especially in a room with tall ceilings. We have 10-foot ceilings in here, and a single stock crown profile would have looked small and out of scale. Building it up from two pieces gives it the presence it needs.
The hardest part of the entire built-in project was getting the crown molding angles right. Crown cuts are compound angles — you’re cutting at two angles at the same time — and if either one is off the joint won’t close. I still remember my husband standing in the garage at midnight in his underwear trying to conquer the crown molding and it makes me giggle. If you have ever wrestled with crown molding, you already know exactly what I’m talking about.
The hardware is from Rejuvenation’s Vernon collection — bin pulls on the bench drawers, mushroom cabinet knobs on the upper cabinets, and an offset drawer pull on the one center drawer. The scale is perfect and it adds that little bit of classical detail that ties back to the Georgian feel of the whole room.
After the built-ins were installed we realized the ceiling light was no longer centered in the room. The built-ins changed where the visual center actually was, so we re-centered it ourselves. If you are comfortable turning off the breaker and working with an electrical box it is very manageable to do in an afternoon.
Built-in paint + hardware:
- Benjamin Moore Baked Pretzel, Semi-Gloss (built-ins, trim, crown molding, and interior door sides) — find at your local Benjamin Moore retailer
- Vernon Bin Pull — Rejuvenation (qty 4)
- Vernon Mushroom Cabinet Knob — Rejuvenation (qty 5)
- Vernon Offset Drawer Pull — Rejuvenation (qty 1)
The Paint Sprayer Situation
Let’s talk about the sprayer.
I decided to spray paint the built-ins instead of brushing and rolling because I wanted a smooth, even finish with no brush marks. I already had a paint sprayer, so I got it out, set everything up. Tarped the floor, taped the walls and got to spraying.
NOT.
The sprayer kept clogging. I would spray for a few minutes, stop to unclog the tip, adjust the pressure, start again. Over and over. And while I was dealing with all of that I hadn’t realized the hose connection wasn’t tight enough, so paint started spewing from the joint and running down the hose and dripping onto everything. The plastic tarp I had laid on the tile ripped and I got paint on the tile, the window and all over me…
After having a mini meltdown, I went and got my husband. He came in, assessed the situation, tightened the hose, and finished spraying the room and I was so grateful.
I am still a believer in the sprayer for built-ins. It absolutely gives you a smoother finish than a brush and roller can when everything is set up correctly. Next time I plan on using a smaller sprayer though. I’ll let y’all know how it goes.
The Wallpaper
This was the part of the project I was most nervous about, and it is the piece I am most proud of.
Morris & Co Willow Bough in Summer Yellow has a large botanical repeat pattern, which means every panel has to match the pattern of the panel next to it at every seam. You can’t just cut and hang. You have to plan your cuts several panels ahead so the repeat lines up correctly, and that planning affects how much paper you use.
I used 4 rolls for the entire room — 150 square feet with 10-foot ceilings. We came out with scraps for leftovers.
That’s the part that made me nervous. We had exactly enough! If I messed up even one panel — misaligned the pattern, made a bad cut, tore the paper — I would have needed to order another full roll and that meant a cost of $400 extra. The cost pressure was real, and it was high.
I did all of the wallpapering myself, every single panel from start to finish. And I will tell you, once the panels started going up and the pattern started matching across the seams and the room started coming together, it was the most satisfying feeling I’ve had on a project in a long time.

I pasted the wall (not the paper). Here is my full process:
First, prime the walls. I used Roman-Pro 977 White Wallpaper Primer. This step is not optional with a high-end paper. You want a clean, sealed surface so the adhesive grabs and holds correctly.
Then I applied Roman PRO-838 Hi-Hide Paste the Wall Adhesive to the wall section by section and hung each panel one at a time. I used a wallpaper smoother to work out any bubbles and a seam roller on the edges. For trimming at the ceiling and baseboard I used this tool for clean cuts, and this wallpaper knife for cutting the panels themselves.
A few things that made a real difference: measure twice before every single cut, USE A LASER LEVEL on the far edge of your wallpaper (not the edge you’re continuing), and keep a damp cloth handy at all times and apply liberal amounts of glue. Work methodically and don’t rush.
There are some imperfections if you look closely. But for my first time wallpapering, I am really happy with how it turned out! Will I redo it in the future? Maybe..
[IMAGE: Finished room final photo | Alt text: “Completed DIY Georgian colonial mudroom makeover with Morris and Co Willow Bough wallpaper, custom built-ins, brick tile floor, and antique copper pendant light, Springhill Lane Interiors”]
Full Product List
Tile + Flooring
- Ackland Montello 2×10 Matte Porcelain Brick Look Tile — AllModern (sourced via Facebook Marketplace)
- MAPEI 50-lb Gray Powder Floor Tile Thinset Mortar — Lowe’s
- MAPEI Ultracolor Plus FA Sanded Grout, Pewter — Lowe’s
- Schluter DITRA Waterproofing Tile Membrane — Lowe’s
Built-Ins
- Benjamin Moore Baked Pretzel, Semi-Gloss — find at your local BM retailer
- Vernon Bin Pull — Rejuvenation (qty 4)
- Vernon Mushroom Cabinet Knob — Rejuvenation (qty 5)
- Vernon Offset Drawer Pull — Rejuvenation (qty 1)
Wallpaper + Tools
- Morris & Co Willow Bough in Summer Yellow (4 rolls)
- Paste the Wall Wallpaper Adhesive
- Wall Primer
- Seam Roller
- Wallpaper Smoother
- Trim Tool for Clean Cuts
- Wallpaper Scissors
Pendant Light
- Antique copper genie lantern with seeded glass and natural patina — sourced via antique dealer on Facebook Marketplace (originally from the Hershey Hotel, Hershey, PA)
Paint Sprayer
- Already owned
Full Cost Breakdown
| Item | Cost |
|---|---|
| Tile — 100 sq ft via Facebook Marketplace | $250.00 |
| MAPEI Thinset Mortar | $5.27 |
| MAPEI Ultracolor Plus FA Grout, Pewter | $24.98 |
| Schluter DITRA Tile Membrane (qty 2) | $258.00 |
| Morris & Co Willow Bough Wallpaper — 4 rolls | $800.00 |
| Wallpaper paste, primer + tools | $176.69 |
| Wood + lumber for built-ins | $500.00 |
| Paint — Benjamin Moore Baked Pretzel | $89.00 |
| Vernon Bin Pulls x4 ($26 each) | $104.00 |
| Vernon Cabinet Knobs x5 ($15 each) | $75.00 |
| Vernon Offset Drawer Pull x1 | $26.00 |
| MD Sales Tax on Hardware (6%) | $12.30 |
| Antique copper pendant light (Facebook Marketplace) | $450.00 |
| Paint sprayer | $0 (already owned) |
| Total | $2,771.24 |
That is the full mudroom breakdown!! The thing I’m most proud of in this whole room is how the wallpaper turned out. It was my first time wallpapering and I was really nervous about getting the pattern to match up and line up correctly. There are some mistakes if you look hard enough. But overall it looks amazing for my first time, and it makes me super happy every time I walk into this room.
If you have any questions on products or processes drop them in the comments — I’m happy to go deeper on any of it. And if you’re planning your own mudroom makeover, I hope this breakdown helps!
⬇️ Pin this post to save it for your next project!
Be the first to comment.